5 things to try if you can’t switch photo/video in DJI go
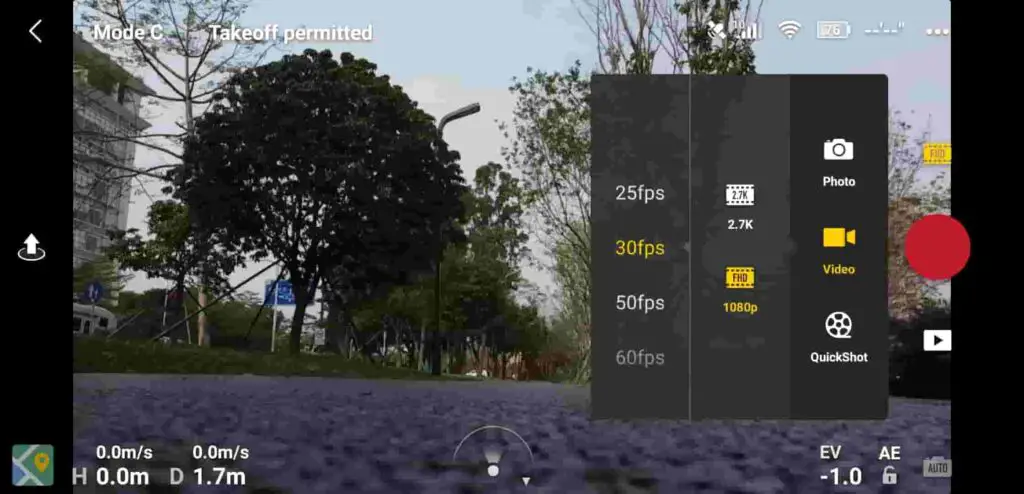
you can’t switch from photo mode to video mode and vice-versa? well, this has been a common issue in DJI drones recently, the issue usually occurs while flying and turns back to normal when landing but in some cases it is permanent.
And this error is not something you can ignore or say I will come back to later because it affects every flight you have significantly, it is like a drone that can’t record video.
I also had this problem about a week ago, after contacting DJI, reading a bunch of forums, hours of frustration, and trying different things, I fixed it and so I thought I could do the same for others.
So Why can’t you switch photo/video and How do You Fix it?
The photo/video switching functionality usually becomes disabled when you are in gesture mode, if you have a wrongly formatted or corrupted sd card, to fix this issue try removing the sd card and disabling gesture mode. if that doesn’t seem to work try refreshing the drone’s firmware in DJI assistant.
However, this issue can’t be pinpointed to a single problem it can be caused by a multitude of things, both hardware and software problems, if it is a hardware problem you might have to send your drone and controller to DJI.
If it is a software problem it is easy, try the troubleshooting methods listed below.
1. Turn off gesture mode
One of the signature features of the DJI drone is thier Hand Gesture mode, which allows users to control the aircraft via simple hand and arm movements, as well as take selfies.
However this mode has shown to have a problem with video mode, so if the drone won’t let you switch from photo to video try disabling this mode.
2. Remove SD card from the osmo
I am not the most technical person but the SD card have a huge correlation with a lot of software in DJI products,
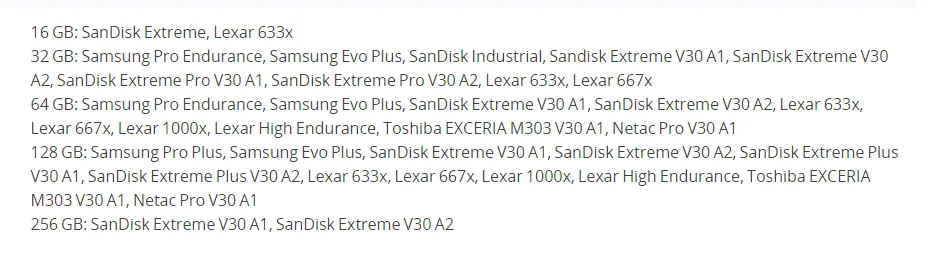
So If you are not using a DJI recommended SD card or if the sd card is formatted with the wrong file type it can cause a lot of issues.
If you have a DJI recommend SD card good if not it is better if you change it, below are the recommended sd cards.
You can also try formatting it, the standard format file on computers is NTFS, you want to change that to exFAT to make it compatible with the drone.
To do that
- Open File Explorer.
- Click on This PC from the left pane.
- Under the “Devices and drives” section, right-click the SD card and select the Format option.
- Use the “File system” drop-down menu and select the exFAT option.
- This process can be a little different on Mac and Linux.
3. Refresh the drones firmware in DJI assistant 2
In the best-case scenario, this problem will be resolved just by refreshing the drone’s firmware.
To do that-
- Power on the drone
- Download the proper dji assistant for your drone
- Connect it to your computer using the USB cable DJI provides
- Open the software on your laptop
- Log in to the DJI Assistant 2 app and select your drone
- Next, you will see the firmware version
- Tap update and choose the latest version
- If it is already the latest version click refresh
- Repeat process with every battery you own
you can also refresh the firmware in DJI go 4 app.
Next update/refresh Controller Firmware
The Drone’s and the controller’s firmware must match so after refreshing or updating your drone’s firmware you should do the same for the controller separately.
So, to update/refresh your RC’s firmware-
- Power on the remote controller
- Connect it to your computer using a USB cable provided
- Open and log into the DJI Assistant 2 software on your laptop
- Select your drone’s remote controller
- Next, you will see the firmware version
- Tap update if you have an older version or tap refresh if it is up to date
- Click on “Start Update”
- On the next screen, you will see the firmware being downloaded, then transmitted and updating the remote controller
- At 100%, you will see the message, “Update Complete”
- After the firmware is complete, the controller will restart automatically
4. Downgrade firmware
If you had this problem after upgrading the software this you can downgrade it until the next version comes out.
To downgrade firmware in DJI assistant–
- Power on the drone
- Connect it to your computer using the USB cable
- Open the DJI Assistant 2 software on your laptop
- Log in to the DJI Assistant 2 app and select your drone
- Next, you will see the firmware version and older versions lined up
- Choose the version one below the current version you have
- Then click install
- Then the drone will automatically restart
To downgrade firmware in DJI go 4
Press and hold the menu icon (three horizontal lines in the top right corner) for five seconds and a special firmware menu appears. You can now select which previous firmware version you would like to downgrade to. Check it out.
Note: After downgrading the drone’s firmware do the same for the controller.
5. Factory reset your drone and controller
Finally, before sending it to DJI where you can pay a lot of money you can try factory resetting the drone.
This is really not important if you have already refreshed the firmware it is just in case there is still some error in the software but you can skip it
- First, Install the DJI Assistant 2 Program on your device, make sure you download the proper one.
- Connect your drone to your laptop using the USB cable provided, and wait for the software till it detects your drone
- You’ll be able to see your drone on the Connected Devices screen. Select your drone and then click on confirm.
- Click on Firmware Update. After that, you’ll be able to see the “Restore factory defaults” button.
- Click on the factory reset button and then confirm when you are asked to confirm the reset. A progress bar will pop up showing the progress of the reset. You’ll be notified when the reset is complete.
Note: After a factory reset you have to calibrate everything again
You can also hard reset the controller
To reset the RC: Turn on the controller, the aircraft should be off. * Press C1, C2, and shutter (top right button nearest antenna) on the controller and hold for about 2 seconds or so until it beeps, then turn the controller off.”
Final choice
If none of the methods fix it, you might have to send it to a professional.
If you have DJI care there is a good chance you can get it fixed without any cost.
DJI can sometimes ask you to send the drone even if it is just to refresh the firmware, so make sure you do everything you can before sending the drone.
After you hand it to DJI it can take up to 15 days till they fix it and send it back to you, and it can take longer if you don’t live in the united states
If you are located in Armenia, you may contact the local dealer or DJI’s support via email to start a case and send the unit back.