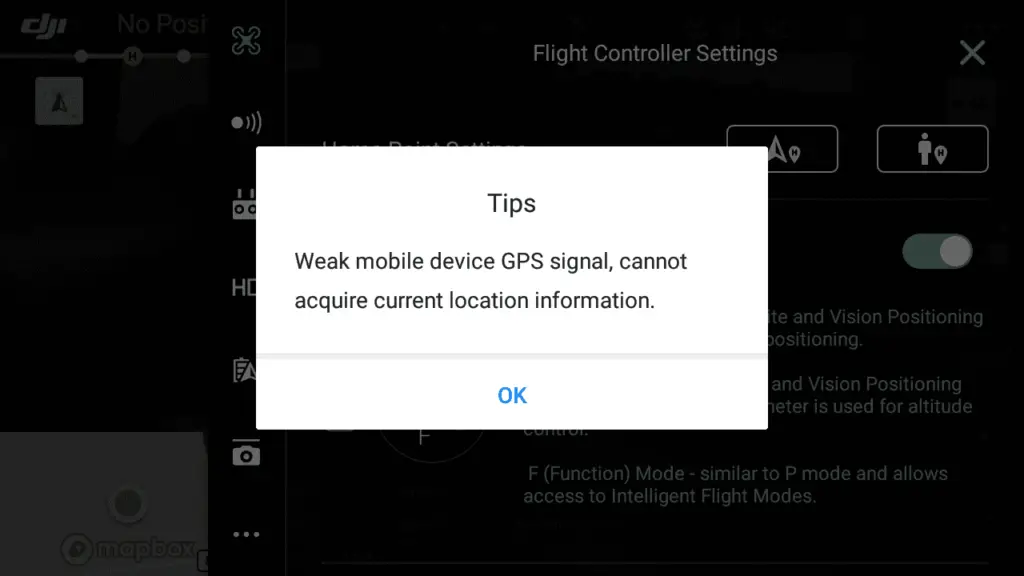
7 ways to fix “weak mobile device GPS signal cannot acquire location info” on DJI drones
There has been an issue people are having, where you get “weak GPS signal” error with their DJI drone usually while using Apple products, but some people have also had this issue with android products.
I also had this issue a couple of weeks ago.
So for me, the Standard RTH (from launch location) works perfectly, however when I activate RTH to controller, I would get the “weak mobile device GPS signal”
Then I went on google and no one understood what the issue was, and was baffled to read people suggesting to buy a new phone as if a new smartphone is sold for 10 bucks.
Then I contacted DJI but they didn’t help me solve the problem, anyways after reading a bunch of forums, hours of frustration, I finally solved mine so I thought I could do the same for others
Note: Also if you don’t want to read the whole article one troubleshooting method I highly recommend is downgrading your drone’s and controller’s firmware!
What causes weak mobile device GPS signal
Your drone has to pinpoint the controller with a 30-meter radius for RTH to work if not you will get a “weak mobile device GPS signal” error. This happens if there are not enough satellites locked in or if the drone needs compass/imu calibration. to fix it try resetting your phone’s network settings.
So what I found out is DJI drone requires a GPS accuracy <30m on Apple device or the smartphone you have to get the home point set. sometimes it can be less than 30 meters.
Anyways there is no one way to fix this problem it is trial and error, so I will mention what helped me fix the issue and I will mention other troubleshooting methods you should also try.
1. Reset Network Settings
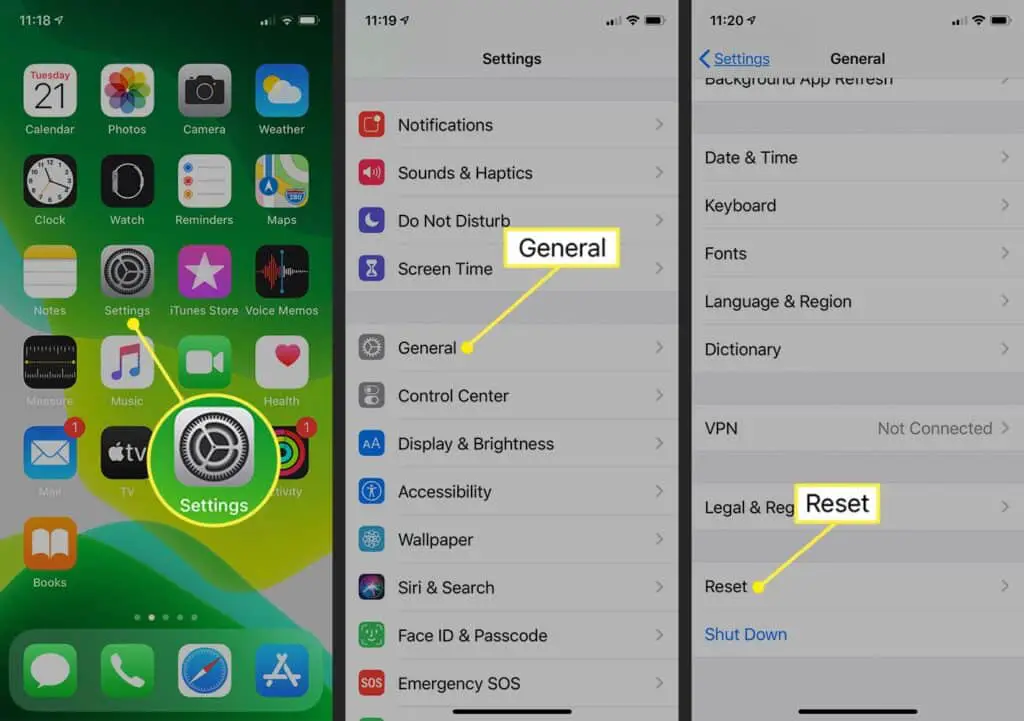
There are times you will experience poor GPS signal causing the location service not to function as it should. If your iPhone is experiencing such a problem you can reset your device’s network settings.
- Go to Settings then click on the General tab
- Tap on the Reset button then click Reset network setting
- This erases all your iPhone’s newwork settings and you will start with a clean plate
- Note: this will also reset VPN, APN settings and Wi-Fi passwords!
If you own an android phone these steps will be a little different
- From the Home screen, navigate: Apps. Settings. Backup and reset.
- Tap. Reset network settings.
- Tap. Reset Settings.
- It might ask for password
2. Reset the Location & privacy settings
Or instead of resetting network settings, you can reset location and privacy settings
- Open the Settings app
- Tap the General menu, select “Reset, and then tap Reset Location & Privacy.
- Enter your PIN and tap “”Reset Settings”” to confirm.
- The next time you use DJI apps, you’ll be prompted to allow or deny access, allow.
3. Refresh the drones firmware in DJI assistant 2
In the best-case scenario, this problem will be resolved just by refreshing the drone’s firmware.
To do that-
- Power on the drone
- Download the proper dji assistant for your drone
- Connect it to your computer using the USB cable DJI provides
- Open the software on your laptop
- Log in to the DJI Assistant 2 app and select your drone
- Next, you will see the firmware version
- Tap update and choose the latest version
- If it is already the latest version click refresh
- Repeat process with every battery you own
you can also refresh the firmware in DJI go 4 app.
Next update/refresh Controller Firmware
The Drone’s and the controller’s firmware must match so after refreshing or updating your drone’s firmware you should do the same for the controller separately.
So, to update/refresh your RC’s firmware-
- Power on the remote controller
- Connect it to your computer using a USB cable provided
- Open and log into the DJI Assistant 2 software on your laptop
- Select your drone’s remote controller
- Next, you will see the firmware version
- Tap update if you have an older version or tap refresh if it is up to date
- Click on “Start Update”
- On the next screen, you will see the firmware being downloaded, then transmitted and updating the remote controller
- At 100%, you will see the message, “Update Complete”
- After the firmware is complete, the controller will restart automatically
4. Recalibrate the compass
calibrating the compass is not going to do much but it wouldn’t hurt to do it.
- Turn on your Mavic Mini and the DJI go 4 app in the Remote Controller.
- Go to the menu in the top right corner.
- Then go to the drone tab on the top left.
- Go to Advanced Settings at the bottom.
- Then go to Sensor State.
- Select “Compass” in the top middle.
- And tap “Calibrate Compass”.
- Then follow the onscreen instructions.
5. Calibrate IMU
After compass calibration follow up with a IMU calibration.
- Go to an open area outside, away from metal structures, cars and such.
- Turn on your Mavic Mini and the DJI go 4 app in the Remote Controller.
- Tap on the 3 dots in the top right corner.
- Tap on “Safety”.
- Scroll down to the “Sensors” section.
- Select “Calibrate” to the right of the Compass.
- Click on “Start”.
- The status indicators lights will blink yellow indicating that the calibration is about to start.
- Then follow the onscreen instructions.
- Hold the aircraft horizontally and rotate it 360 degrees in the clockwise direction.
- When the Mavic Mini indicator light changes from yellow to solid green then move on to the vertical calibration.
- Hold the Mavic Mini vertically with its nose pointing upwards and rotate it 360 degrees around its vertical axis.
- The Mavic Mini indicator will turn from yellow to solid green when successful.
- When both horizontal and vertical compass calibration is completed successfully, the indicator light will start flashing green.
6. Downgrade firmware
Downgrading your drone’s firmware is a very underrated way of troubleshooting, and I defiantly recommend doing it
To downgrade firmware in DJI assistant–
- Power on the drone
- Connect it to your computer using the USB cable
- Open the DJI Assistant 2 software on your laptop
- Log in to the DJI Assistant 2 app and select your drone
- Next, you will see the firmware version and older versions lined up
- Choose the version one below the current version you have
- Then click install
- Then the drone will automatically restart
To downgrade firmware in DJI go 4
Press and hold the menu icon (three horizontal lines in the top right corner) for five seconds and a special firmware menu appears. You can now select which previous firmware version you would like to downgrade to. Check it out.
Note: After downgrading the drone’s firmware do the same for the controller.
7. Factory reset your drone and controller
Finally, before sending it to DJI where you can pay a lot of money you can try factory resetting the drone.
This is really not important if you have already refreshed the firmware it is just in case there is still some error in the software but you can skip it
- First, Install the DJI Assistant 2 Program on your device, make sure you download the proper one.
- Connect your drone to your laptop using the USB cable provided, and wait for the software till it detects your drone
- You’ll be able to see your drone on the Connected Devices screen. Select your drone and then click on confirm.
- Click on Firmware Update. After that, you’ll be able to see the “Restore factory defaults” button.
- Click on the factory reset button and then confirm when you are asked to confirm the reset. A progress bar will pop up showing the progress of the reset. You’ll be notified when the reset is complete.
Note: After a factory reset you have to calibrate everything again
You can also hard reset the controller
To reset the RC: Turn on the controller, the aircraft should be off. * Press C1, C2, and shutter (top right button nearest antenna) on the controller and hold for about 2 seconds or so until it beeps, then turn the controller off.”