6 Ways to Fix Mavic Pro IMU Calibration Error -50
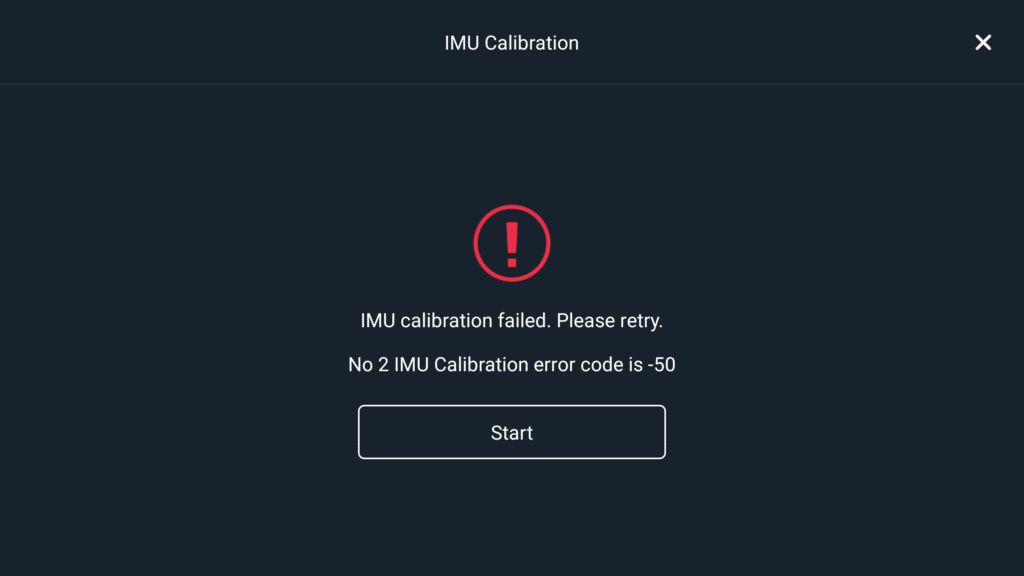
There is a problem with DJI Mavic pro where it gives you ” IMU calibration error code -50″ I had this exact problem a couple of days before writing this article, and I went on google but no one had a clear answer.
Then I contacted DJI support but they couldn’t have been more naive, anyways after reading a bunch of forums, hours of frustration, I finally solved mine so I thought I could do the same for others
What is causing Mavic Pro IMU Calibration Error -50
There is no one single reason you are getting IMU Calibration Error -50 on your Mavic pro, but the common reasons are, being near to a metal structure, a messed up software and/or hardware.
So in the next sections, I will show you how to properly calibrate your Mavic mini.
1. perform IMU calibration
For a successful IMU calibration, it is crucial that you follow the steps exactly as you see on the screen, or you will get stuck on one of the steps.
Before doing this process you can turn your house’s ac to go below room temperature, Get the AirCraft (A/C) as cold as possible, you can even place it in a refrigerator, and then recalibrate the IMU.
The colder you can get it, the sooner you can get the process started after removing it from the cold area.
You can also do this process at night outside of your house where the temperature is colder, then when you want to fly your drone at day time it wouldn’t take as much time to initialize IMU.
- First, startup Aircraft & Controller
- From DJI go 4 app go to Menu on the top right
- Go to Aircraft button (in the menu the uppermost button)
- Then go to Advanced Settings then Sensors State
- “IMU Calibration”
- When done (can take UP TO 10mins!) -> “Check IMU”
2. Refresh firmware in DJI assistant 2
You should also do the classic troubleshooting methods staring of with refreshing the firmware
- Power on the drone
- Connect it to your computer using the USB cable DJI provides
- Open the DJI Assistant 2 software on your laptop
- Log in to the DJI Assistant 2 app and select your drone
- Next, you will see the firmware version
- Tap update and choose the latest version
- If it is already the latest version click refresh
- Repeat process with other batteries(if you own one)
Update/refresh Controller Firmware
The Drone’s and the controller’s firmware must match so after refreshing or updating your drone’s firmware you should do the same for the controller.
So, to update/refresh your RC’s firmware-
- Power on the remote controller
- Connect it to your computer using a USB cable provided
- Open and log into the DJI Assistant 2 software on your laptop
- Select your drone’s remote controller
- Next, you will see the firmware version
- Tap update if you have an older version or tap refresh if it is up to date
- Click on “Start Update”
- On the next screen, you will see the firmware being downloaded, then transmitted and updating the remote controller
- At 100%, you will see the message, “Update Complete”
- After the firmware is complete, the controller will restart automatically
3. Downgrade firmware
If both of the previous methods don’t seem to work, you can downgrade the firmware till the next update comes out.
You can downgrade your firmware both in DJI assistant and DJI go 4.
To downgrade firmware in DJI assistant–
- Power on the drone
- Connect it to your computer using the USB cable
- Open the DJI Assistant 2 software on your laptop
- Log in to the DJI Assistant 2 app and select your drone
- Next, you will see the firmware version and older versions lined up
- Choose the version one below the current version you have
- Then click install
- Then the drone will automatically restart
To downgrade firmware in DJI go 4
press and hold the menu icon (three horizontal lines in the top right corner) for five seconds and a special firmware menu appears. You can now select which previous firmware version you would like to downgrade to. Check it out.
It is better if you downgrade with DJI go 4 because the controller will follow automatically.
If you downgrade in DJI assistant you most likely have to do the same with the controller
4. Factory reset the Mavic pro
- First, Install the DJI Assistant 2 Program on your device, make sure you download the proper one.
- Connect your drone to your laptop using the USB cable provided, and wait for the software till it to detect your drone
- You’ll be able to see your drone on the Connected Devices screen. Select your drone and then click on confirm.
- Click on Firmware Update. After that, you’ll be able to see the “Restore factory defaults” button.
- Click on the factory reset button and then confirm when you are asked to confirm the reset. A progress bar will pop up showing the progress of the reset. You’ll be notified when the reset is complete.
Note: After a factory reset you have to calibrate everything again.
5. Use a different phone
If you are using android to calibrate the IMU and it is not working try swapping it with ios, and vice versa.
6. Change location and avoid metal structures
I am not sure why but DJI recommends doing IMU calibration on an open field, so if you are doing the imu calibration in a tightly enclosed space go out and try it again.
Final choice
If none of the methods fix it you there might be a problem with one internal component and you might to send it to a professional.
If your drone is within a year period from activation, which I would guess is not because this error usually happens on older drones, however, if it is or if you have DJI care DJI will fix it for you for free
If not you might have to pay a good sum of money depending on the situation
After you hand it to DJI it can take up to 15 days till they fix it and send it back to you, and it can take longer if you don’t live in the united states
If you are located in Armenia, you may contact the local dealer or DJI’s support via email to start a case and send the unit back.

