Troubleshoot Your DJI Drone’s Camera: Tips and Tricks
Flying your aerial photography equipment should be exciting, not frustrating. When your quadcopter’s imaging system starts acting up, it can turn perfect flight conditions into missed opportunities. Blurry footage, gimbal stuttering, and software glitches don’t have to ground your adventures.
This comprehensive camera repair guide walks you through the most common drone camera issues that pilots face. From simple calibration fixes to advanced diagnostic techniques, our step-by-step approach helps you identify problems quickly. Both newcomers and experienced operators can follow these practical solutions with confidence.
Professional-quality results depend on properly functioning imaging hardware. Instead of sending your equipment for costly repairs, many problems have simple home solutions. Our friendly troubleshooting methods can restore your flight performance and get you back to capturing stunning aerial content.
Key Takeaways
- Most imaging system problems have simple diagnostic solutions you can perform at home
- Proper gimbal calibration resolves the majority of stability and focus issues
- Software updates and app reinstallation fix many connectivity problems
- Regular maintenance prevents expensive hardware repairs and extends equipment lifespan
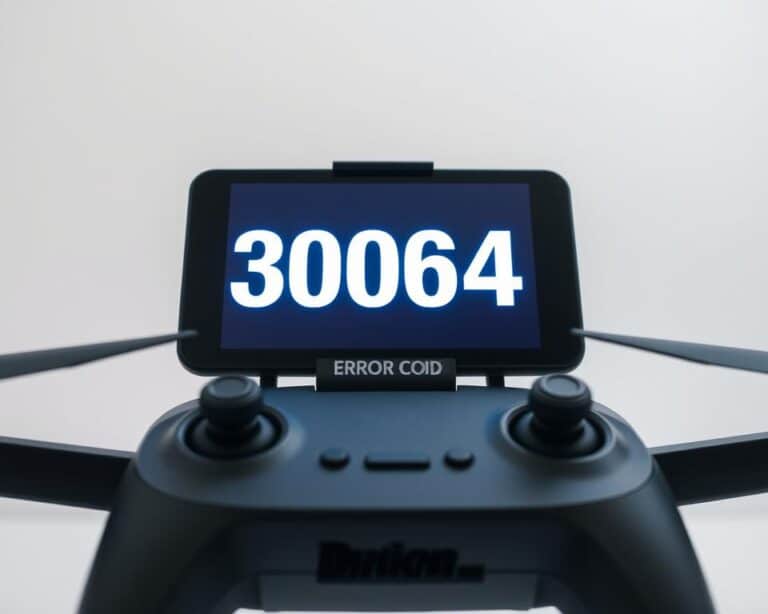
- Understanding error codes helps identify specific component malfunctions quickly
- Basic cleaning techniques restore optimal lens performance and image quality
Understanding Common DJI Camera Problems
Most DJI camera problems stem from a handful of common issues that are relatively easy to identify and resolve. Before jumping into complex troubleshooting steps, it’s essential to recognize the symptoms and understand what typically causes these malfunctions. This knowledge helps you apply the right fix quickly and avoid wasting time on unnecessary solutions.
Camera issues usually fall into three main categories. Each category has distinct symptoms that point to specific underlying causes. By learning to identify these patterns, you can diagnose problems faster and get back to capturing amazing aerial footage.
Blurry or Out-of-Focus Images
Blurry drone footage ranks among the most frustrating issues for pilots. This problem typically occurs when the camera’s autofocus system malfunctions or when the lens gets dirty or damaged. Sometimes, incorrect camera settings or rapid movements during flight can also cause focus problems.
The issue might also stem from vibrations affecting the camera system. When your drone’s motors or propellers create excessive vibration, it can blur your shots even with a properly functioning camera. Environmental factors like strong winds can worsen this problem.
Camera Not Recording or Taking Photos
Recording failures often indicate software glitches or memory card issues. Your drone might appear to record normally, but no files get saved to the storage device. This frustrating problem usually happens when the memory card becomes corrupted, full, or incompatible with your drone model.
Sometimes, the DJI Fly app loses connection with the camera system. When this happens, you’ll see error messages or find that the record button becomes unresponsive during flight.
Gimbal Malfunction and Instability Issues
Gimbal malfunction creates shaky, unstable footage that ruins your aerial videos. These problems often occur after hard landings, crashes, or when debris gets stuck in the gimbal mechanism. The gimbal might tilt incorrectly, shake constantly, or fail to respond to your control inputs.
Calibration errors also cause gimbal instability. When the system loses its reference points, it struggles to maintain smooth camera movements and proper horizon alignment during flight operations.
Essential Pre-Flight Camera Checks
Smart drone pilots know that proper pre-flight inspection routines prevent 90% of camera-related flight disappointments. Taking these preventive steps ensures your DJI drone delivers professional results every time you take to the skies.
A systematic approach to checking your camera system takes less than five minutes but saves hours of frustration later. These essential checks help identify potential problems before they ruin your shooting session.
“The best drone footage comes from pilots who never skip their pre-flight checklist. It’s the difference between amateurs and professionals.”

Inspecting the Camera Lens for Damage
Your camera lens check should begin with a visual inspection for cracks, scratches, or smudges. Even tiny scratches can create unwanted artifacts in your footage. Hold your drone at eye level and examine the lens under good lighting.
Look for hairline cracks around the lens edges, which often occur from hard landings or impacts. Check the protective glass cover for any chips or deep scratches that could affect image quality.
Clean fingerprints and dust particles using a microfiber cloth and lens cleaning solution. Avoid using paper towels or rough materials that might scratch the delicate lens surface.
Verifying Gimbal Alignment and Movement
Proper gimbal alignment ensures smooth, stable footage throughout your flight. Start by powering on your drone and observing the gimbal’s initialization sequence. The camera should center itself and move smoothly through its range of motion.
Gently move your drone left and right while watching the gimbal compensate for the movement. Any jerky motions, unusual sounds, or failure to stabilize indicates potential calibration issues.
Test the gimbal’s pitch, roll, and yaw movements using your controller. Each axis should respond smoothly without hesitation or grinding noises.
Checking Memory Card Status and Capacity
Nothing ruins a perfect flight like discovering your memory card is full or corrupted mid-session. Always verify your SD card has sufficient space for your planned recording time.
Check the card’s write speed rating matches your camera’s requirements. For 4K recording, use Class 10 or UHS-I cards with minimum 30MB/s write speeds.
Format your memory card in-camera before each flight session. This process optimizes the card’s file system and reduces the risk of recording errors or file corruption during flight.
How to Troubleshoot a Drone’s Camera DJI Software Issues
DJI software update procedures can eliminate most camera-related problems that pilots encounter during flight operations. These issues often appear as frozen screens, unresponsive controls, or poor image quality. The good news is that software problems are usually easier to fix than hardware damage.
Most camera malfunctions happen when your drone’s software components fall out of sync. Your mobile app, drone firmware, and camera settings all need to work together smoothly. When one piece gets outdated or corrupted, the whole system can struggle.

Updating DJI Fly App to Latest Version
Your DJI Fly app serves as the control center for your drone’s camera system. Outdated app versions often cause connection problems and missing features. Check your app store regularly for updates, as DJI releases improvements frequently.
To update your app, open your device’s app store and search for “DJI Fly.” If an update appears, tap the update button and wait for completion. Always close the old app completely before opening the updated version. This prevents cached data from causing conflicts.
After updating, restart your mobile device and reconnect to your drone. Test basic camera functions like photo capture and video recording to ensure everything works properly.
Installing Firmware Updates for Camera Systems
Firmware installation keeps your drone’s internal software current with the latest improvements. DJI releases firmware updates to fix bugs, enhance performance, and add new camera features. Skipping these updates can leave your drone vulnerable to known issues.
Connect your drone to the DJI Fly app and check the firmware status in the settings menu. When updates are available, ensure your drone battery has at least 50% charge before starting. Never power off your drone during firmware installation, as this can cause serious damage.
The firmware installation process typically takes 10-15 minutes. Keep your mobile device close to the drone and avoid interruptions. Your drone will restart automatically when the update completes successfully.
Resetting Camera Settings to Factory Default
Sometimes corrupted settings cause persistent camera problems that updates can’t fix. A camera settings reset clears all custom configurations and returns everything to original factory values. This solution works well for exposure issues, color problems, and recording failures.
Access the camera settings menu through your DJI Fly app. Look for “Reset Camera Settings” or “Factory Default” options. Remember that this camera settings reset will erase all your custom photo and video preferences.
After resetting, reconfigure your preferred settings like resolution, frame rate, and color profiles. Take test shots to verify that your camera now functions correctly. Most pilots find this DJI software update approach resolves stubborn performance issues effectively.
Fixing Physical Camera and Gimbal Problems
Your DJI drone’s camera and gimbal system need regular physical maintenance to perform at their best. Physical problems can range from simple dust accumulation to more complex mechanical failures. Understanding how to address these issues safely will help you maintain professional-quality footage and extend your equipment’s lifespan.
Before attempting any repairs, always power down your drone completely and remove the battery. This prevents accidental activation during maintenance work. Keep your workspace clean and well-lit to avoid losing small components.

Cleaning the Camera Lens and Protective Cover
Camera cleaning requires gentle techniques to avoid scratching delicate surfaces. Start by using a soft brush or compressed air to remove loose debris from around the lens housing. Never blow directly on the lens with your mouth, as moisture can cause damage.
For the actual lens cleaning, use only microfiber cloths designed for camera equipment. Apply lens cleaning solution to the cloth, never directly to the lens. Work in circular motions from the center outward. Stubborn smudges may require multiple gentle passes rather than increased pressure.
The protective cover also needs regular attention. Remove it carefully and clean both sides using the same gentle technique. Check for cracks or deep scratches that might affect image quality.
Addressing Gimbal Calibration and Motor Issues
Gimbal calibration problems often manifest as tilted horizons or unstable footage. Most DJI drones offer automatic calibration through the mobile app. Place your drone on a level surface and follow the on-screen instructions carefully.
Motor issues typically present as jerky movements or unusual sounds during gimbal operation. First, check for physical obstructions like hair or debris caught in the mechanism. Small foreign objects can cause significant performance problems.
If calibration fails repeatedly, the gimbal motors may need professional attention. However, you can try a manual calibration reset first. Access this feature through your drone’s advanced settings menu.
Resolving Mechanical Damage and Loose Connections
Mechanical damage repair starts with careful inspection of all visible components. Look for bent brackets, loose screws, or damaged ribbon cables. Use proper lighting and magnification when examining small parts.
Loose connections often cause intermittent camera failures. Gently check all cable connections without forcing anything. Ribbon cables are particularly fragile and should only be handled when absolutely necessary.
| Problem Type | Symptoms | DIY Solution | Professional Repair Needed |
|---|---|---|---|
| Loose Screws | Rattling sounds, unstable gimbal | Tighten with appropriate screwdriver | No |
| Bent Housing | Gimbal hits frame, restricted movement | Gentle realignment if minor | Yes, if severe |
| Damaged Cables | No camera feed, erratic behavior | Visual inspection only | Yes |
| Motor Failure | No gimbal movement, error messages | Clean debris, recalibrate | Yes, if cleaning fails |
For serious mechanical damage, resist the temptation to force components back into place. This approach often creates additional problems that increase repair costs. Document the damage with photos before attempting any fixes, as this information helps professional repair services.
Memory Card and Storage Troubleshooting
Memory card issues rank among the most common yet preventable problems affecting DJI drone recording sessions. These storage-related troubles can interrupt your flights and potentially cause permanent data loss. Understanding proper memory card compatibility requirements and maintenance procedures will help you avoid these frustrating situations.
Most recording failures stem from using incompatible cards or improper setup procedures. Your drone’s camera system relies on consistent data transfer speeds to maintain video quality. When storage problems occur, they often manifest as choppy footage, recording interruptions, or complete system freezes.

Formatting SD Cards Using Proper Methods
Proper SD card formatting ensures optimal performance and prevents recording errors. Always format your memory card using your DJI drone’s built-in formatting function rather than your computer. This process creates the correct file system structure that your drone expects.
Access the formatting option through your DJI Fly app’s camera settings menu. The process typically takes 30-60 seconds and will erase all existing data. Always back up important files before formatting to prevent accidental data loss.
Selecting Compatible High-Speed Memory Cards
Choosing the right memory card prevents most storage-related problems. Your DJI drone requires specific speed ratings and capacity limits for reliable operation. Using incompatible cards often results in recording failures and system errors.
| DJI Model | Minimum Speed Class | Recommended Capacity | Maximum Supported Size |
|---|---|---|---|
| Mini 3/Mini 3 Pro | U3/V30 | 64GB-128GB | 256GB |
| Air 2S/Air 2 | U3/V30 | 128GB | 256GB |
| Mavic 3/Mavic 3 Pro | U3/V30 | 128GB-256GB | 1TB |
| FPV/Avata | U3/V30 | 64GB-128GB | 256GB |
Recovering and Fixing Corrupted Video Files
When file recovery becomes necessary, act quickly to maximize your chances of success. Stop using the affected memory card immediately to prevent further data corruption. Remove the card from your drone and avoid taking additional photos or videos.
Use specialized recovery software like Recuva or PhotoRec for basic file restoration. For severely corrupted files, professional data recovery services might be your only option. Prevention through proper card maintenance remains the most effective strategy for avoiding data loss situations.
Camera Settings Optimization for Better Performance
Many perceived camera malfunctions stem from incorrect settings rather than actual hardware problems. Your DJI drone captures stunning footage when you configure its camera properly for different environments and shooting scenarios. Camera settings optimization transforms ordinary clips into professional-quality content that showcases your creative vision.
Understanding how each setting affects your final output helps you troubleshoot issues quickly. Poor image quality often results from mismatched settings rather than faulty equipment. The right configuration saves time during post-production and delivers better results straight from your drone.

Adjusting Resolution and Frame Rate Settings
Resolution settings directly impact both image quality and file size on your memory card. Choose 4K recording for maximum detail when you have sufficient storage space and processing power. Switch to 1080p for longer flights or when you need smaller file sizes for quick sharing.
Frame rate selection depends on your intended use and lighting conditions. Use 24fps for cinematic footage with natural motion blur. Select 30fps for standard video content with smooth playback. Choose 60fps when you plan to create slow-motion effects in post-production.
Higher frame rates require more storage space and processing power. Balance your creative needs with your drone’s capabilities and available memory card capacity.
Setting Proper Exposure and ISO Controls
Exposure control prevents overexposed highlights and underexposed shadows in your footage. Use manual exposure settings when lighting conditions remain consistent throughout your flight. Switch to automatic exposure for rapidly changing light situations.
Keep ISO values as low as possible to minimize digital noise in your images. Start with ISO 100 in bright daylight conditions. Increase ISO gradually in darker environments, but avoid exceeding ISO 800 unless absolutely necessary.
Adjust shutter speed to control motion blur and maintain proper exposure. Follow the 180-degree rule by setting your shutter speed to double your frame rate for natural-looking motion.
Configuring White Balance and Color Profiles
White balance ensures accurate color reproduction across different lighting conditions. Use daylight settings for outdoor flights in sunny weather. Switch to cloudy mode when overcast skies create cooler color temperatures.
Color profiles affect how your drone processes and saves image data. Choose Normal mode for immediate sharing without post-processing. Select D-Cinelike or D-Log profiles when you plan extensive color grading in editing software.
Custom white balance settings provide the most accurate results when you have time for proper calibration. This exposure control technique ensures consistent colors throughout your entire flight session.
Advanced Troubleshooting Techniques
Professional-level troubleshooting techniques offer powerful solutions when conventional methods can’t restore your drone’s camera functionality. These advanced approaches target core system components and require more technical knowledge than basic fixes. When simpler solutions fail, these methods can often resolve persistent issues that have been frustrating drone operators.
Advanced troubleshooting involves three main areas: comprehensive system calibration, complete device resets, and detailed hardware analysis. Each technique serves a specific purpose in diagnosing and fixing complex problems.
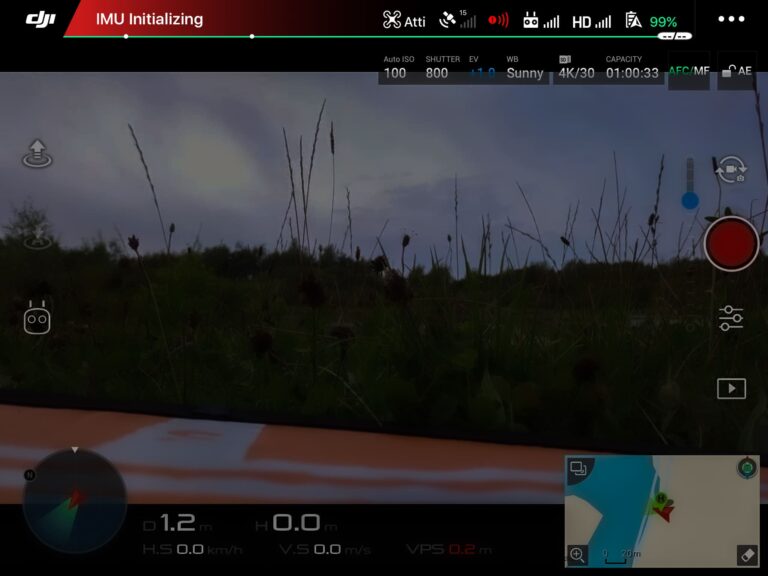
Performing Complete IMU and Compass Calibration
IMU calibration addresses fundamental stability and positioning problems that affect camera performance. The Inertial Measurement Unit controls how your drone understands its position in space. When this system becomes misaligned, camera footage can appear shaky or unstable even when the gimbal seems fine.
Start the IMU calibration process through your DJI Fly app’s aircraft settings menu. Place your drone on a completely level surface away from metal objects and electromagnetic interference. The calibration requires precise positioning in six different orientations as prompted by the app.
Compass calibration should follow immediately after IMU calibration. This two-step process ensures your drone’s navigation systems work harmoniously with the camera stabilization. Complete both calibrations in an open area away from buildings and power lines.
Executing Factory Reset Procedures Safely
A factory reset procedure can resolve software conflicts that prevent proper camera operation. This process returns all settings to their original state, eliminating corrupted configurations or conflicting parameters.
Before initiating any reset, back up your custom settings and flight logs. Access the factory reset option through the DJI Fly app’s system settings. The process typically takes 5-10 minutes and requires a stable connection throughout.
“Always ensure your drone has at least 50% battery before starting a factory reset to prevent interruption during the process.”
After the reset completes, you’ll need to reconfigure your preferred camera settings and reconnect to your mobile device. This fresh start often resolves persistent software issues.
Diagnosing Hardware Failures and Component Issues
Hardware diagnosis involves systematic testing to identify physical component failures. Visual inspection comes first – look for loose connections, damaged ribbons, or signs of impact around the camera assembly.
Test individual components by accessing diagnostic modes through the DJI Assistant software on your computer. This professional tool provides detailed system reports and can identify failing sensors or motors before they cause complete failure.
Pay attention to error codes and unusual sounds during operation. Grinding noises from the gimbal or frequent calibration failures often indicate hardware problems requiring professional repair. Document these symptoms to help service technicians if replacement becomes necessary.
Preventive Maintenance for DJI Camera Systems
Smart maintenance habits prevent costly repairs and extend your DJI camera’s operational life. Taking proactive steps to care for your drone’s camera system saves money and ensures reliable performance during critical shooting moments. A well-maintained camera delivers consistent results and reduces the risk of equipment failure during important flights.
Preventive care involves three key areas that work together to protect your investment. These practices become second nature once you establish consistent routines.
Establishing Regular Cleaning and Inspection Schedules
Creating a drone maintenance schedule keeps your camera system in optimal condition. Clean your camera lens after every five flights or weekly, whichever comes first. Use a microfiber cloth and lens cleaning solution designed specifically for optical equipment.
Inspect the gimbal mechanism monthly for loose screws or damaged components. Check all cable connections and look for signs of wear on moving parts. Document any changes in gimbal performance or unusual sounds during operation.
Schedule deep cleaning sessions quarterly. Remove accumulated dust from motor housings and sensor areas using compressed air. This thorough approach prevents debris buildup that can cause mechanical failures.
Implementing Proper Storage and Transportation Practices
Effective equipment storage begins with choosing the right environment. Store your drone in a cool, dry location with temperatures between 59-77°F (15-25°C). Avoid basements, attics, or areas with high humidity levels.
Use protective cases with foam inserts that secure the gimbal during transport. Remove the battery before long-term storage and store it separately at 40-60% charge level. This prevents battery degradation and protects internal components.
Transport your drone in a hard case whenever possible. Soft cases work for short trips, but hard cases provide superior protection against impacts and pressure changes during travel.
Protecting Equipment from Environmental Hazards
Environmental protection strategies shield your camera from weather-related damage. Never fly in rain, snow, or high humidity conditions above 85%. Moisture can damage electronic components and cause corrosion.
Protect your drone from extreme temperatures. Cold weather reduces battery life and can affect gimbal performance. Hot conditions may cause overheating and thermal damage to sensitive camera sensors.
| Environmental Factor | Safe Operating Range | Protection Method | Risk Level |
|---|---|---|---|
| Temperature | 32-104°F (0-40°C) | Climate-controlled storage | High |
| Humidity | Below 85% | Silica gel packets | Medium |
| Wind Speed | Under 25 mph | Weather monitoring apps | High |
| UV Exposure | Limited direct sunlight | UV-protective cases | Low |
Conclusion
Mastering these troubleshooting techniques puts you in control of your aerial photography experience. This comprehensive DJI troubleshooting summary covers everything from basic software updates to complex gimbal repairs. Most camera issues stem from simple causes that you can fix yourself with patience and the right approach.
Regular maintenance prevents most problems before they start. Clean your lens weekly, check gimbal alignment before each flight, and keep your firmware updated. These camera maintenance tips will extend your equipment’s lifespan and ensure consistent image quality.
Know when to tackle repairs yourself versus seeking professional drone support. Software glitches, dirty lenses, and basic calibration issues are perfect DIY projects. Complex mechanical failures or water damage require expert attention to avoid costly mistakes.
Bookmark this guide as your go-to reference. Camera problems often happen at the worst moments, but having these solutions at your fingertips means less downtime and more flying time. Most issues resolve quickly once you identify the root cause.
Your DJI drone’s camera system is built to capture stunning footage for years. With proper care and systematic troubleshooting, you’ll spend less time fixing problems and more time creating amazing aerial content. Get back out there and start capturing those breathtaking shots you’ve been planning.